
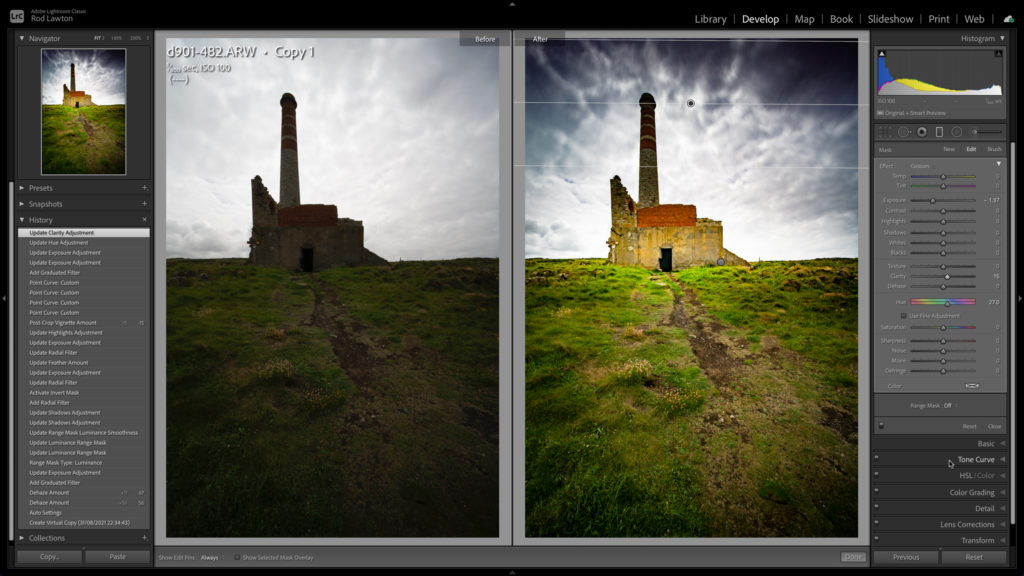
So yes, Lightroom does have a Tone Curve panel which kind of does the same thing as levels adjustments, but you have to drag the black point and white point control points manually for each image – there’s no auto option. And yes, you can use Lightroom’s Auto tone adjustments, but these adjust eight different sliders at once, which is equally annoying. It’s why I keep going back to Capture One.
Lightroom Classic
Lightroom Classic is an all-in-one photo cataloguing, organising and editing tool that is based around the original Adobe Lightroom and desktop image storage. It's one of the most popular and widely used photo editing applications on the market and is available alongside Adobe Photoshop as part of the subscription based Adobe Photography Plan.
Read related articles below and read this full Lightroom Classic review
I live in an extraordinary place. And so do you

I normally post editing techniques and ideas on Life after Photoshop, but this is slightly different. It’s about where we live and how we see it – or even IF we see it. The fashion in photography is to chase around the world looking for ever more spectacular subjects, sights and experiences. Now we take photographs for audiences and algorithms, not ourselves, and that’s our loss.
How to turn black and white negatives into positives in Adobe Lightroom

Lightroom doesn’t have a ‘negative’ filter for turning negative images into positives, so how do you do it? I’ve been going through my old mono negatives, rephotographing them with a camera and a macro lens, and I wanted to figure out how to convert them without using an external tool – and here’s how it’s done! (And it should work in any other software with curves adjustments.)
How I make my digital images look more analog

Digital images don’t look like analog. They just don’t. And it’s not just as simple as changing the colors, adding a sepia tone or applying a vignette, or a frame. There are plenty of programs and plug-ins that can recreate that analog look, or they promise to do that, but often they use very obvious techniques to make pictures look old. I’ve done this lots of times myself, I’ve nothing against this approach. It’s fine if you want to create a very obvious effect, but what I want to do today is different.
How to get an authentic looking vintage black and white look

So far in this series I’ve looked at black and white conversion tools, basic black and white tonal adjustments and the different ways you can use digital dodging and burning to bring black and white images to life. But if you want to make them look actually old, there’s a bit more to do. It’s not one single technique you need, but a whole bunch used together.
Is simple folder browsing software like Adobe Bridge all you need for organizing your photos?

In this article I want to explain the difference between what I’ll call ‘image browsers’ and ‘image cataloguers’. Image cataloguing tools like Adobe Lightroom import your photos into a database and offer very sophisticated, very adaptable organizing and search options. But they bring their own limitations and complications. What’s the alternative?
Lightroom tip: Lightroom’s new Reflections removal tool really does work, and here’s how to use it

It sounds nigh-on impossible, but Lightroom’s new AI powered Remove option really can wipe away reflections in glass as if they had never existed. This is something which would be very, very difficult to achieve using regular editing tools. I’ve tried it out on a number of different images and been impressed by just how effective it is.
Lightroom tip: How to get Lightroom’s new Distraction Removal (People) tool to work!

This post was written soon after the new Distraction tools were added to Lightroom, so some of the issues I talk about may have been solved by the time you read this. This post is for anyone struggling to get the early version working…
Lightroom tip: Lightroom’s Enhance feature just got a huge update – did you spot it?

Lightroom’s Enhance feature used to create a new (larger) DNG file alongside the original RAW file, but now it doesn’t! That’s huge news for anyone who uses Adobe’s AI denoising tool regularly. Here’s how the new setup works.
Lightroom tip: Lightroom’s new Adaptive Color profile is MUCH better than it sounds

So what?, you’re thinking. Why do we need another generic Adobe profile when we can choose one that matches the camera’s own rendition and picture styles, or choose one of Adobe’s many built in black and white, creative, modern or vintage profiles? Well let’s see…